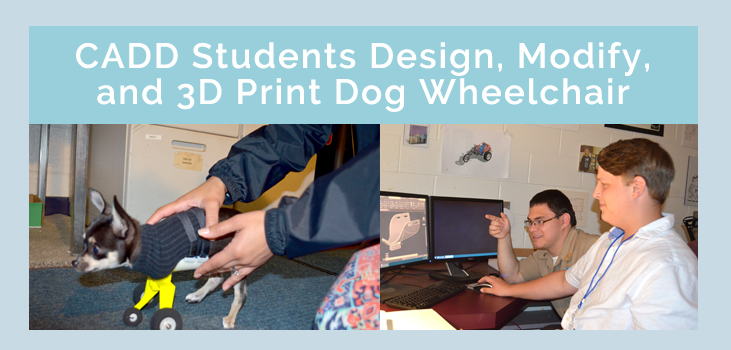
We are thrilled to share this project-based learning story with you. It comes from CADD Instructor, Dr. Bob Molkenthin from the Aiken County Career & Technology Center. There once was a puppy that was born without its front legs. It just so happens, that his owner was a former student that Dr. Bob’s class had assisted in designing and building a mechanical hand for a school project. She called, and Dr. Bob and his class got started devising a plan to help this dog walk and run on his own. The class uses CADD (Computer-Aided Drafting and Design) programs to draw all their projects, to scale 2D drawings, and to create 3D models. These types of programs typically use software such as PTC Creo, AutoCAD, and SOLIDWORKS. They allow students to adjust their drawings and models as needed.
Getting Started on this CADD Project
 The students began by taking measurements of the dog. This was necessary to develop their first designs on paper. Then, they started brainstorming ways they could build a prosthetic to fit him. They had to determine what parts were needed and how the 3d printer would build each part. It was important to keep the design simple enough so any 3d printer could build it. They researched “doggy wheelchairs” on the internet for ideas. They discovered some similar wheelchairs that were built using 3D printers. The students reviewed the designs and agreed that they could come up with a similar design, but make it different enough to call their own. Most of the designs found online had a solid axle design. The students thought that this design might flip the dog over when it came to an uneven surface. An independent suspension, wheel design was created that would prevent the dog from falling over when it hit a bump. 3D solid models of the first design idea were created. The next step was altering the design to meet the dog’s special needs.
Dog Wheelchair Design Process
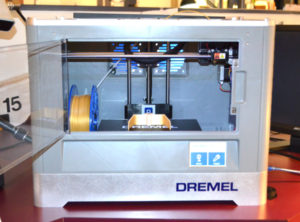
 The design process evolved through testing as noted below. Training the dog was also an important element of this design process. The class used a Dremel 3D printer to create the parts.
Design #1:
In the first design, there was a body support structure for under the dog’s body and a wheel design structure of a “U” shape frame that had a tire attached to each side and it had a narrow stance.
Design #2:
When the dog came in for his fitting, it was apparent that a few changes were needed. The students noticed that the body support structure needed to be shorter. Also, the body structure kept sliding back and forth. A material was needed to stop the sliding. The inside of the body section was lined with a rubber type material to stop the sliding. Also, the Velcro straps kept sliding on top each other making it difficult to evenly support the dog’s body. A small separation unit was created to go between the straps in order to keep the straps evenly separated for better support.
Design #3:
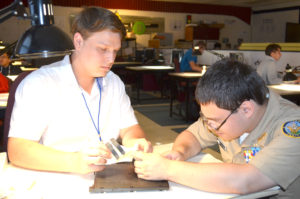
 For the third design change, they checked the body prosthetic unit fitting and completed a walking test. The dog adapted easily to the prosthetic on his body. It was almost as if he knew what it was. He must have realized that it would help him walk better and did not reject it. There was a problem falling forward and a few problems falling over from side to side. One of the students said, “I did the same thing when I was learning how to ride his first bike”. The light bulb went off in all the students’ heads and everyone at the same time said, “Training Wheels”.
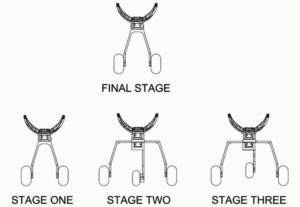
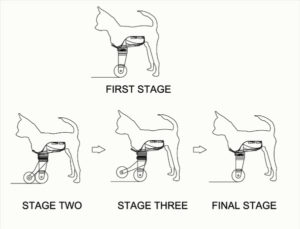
 The wheel assembly required three design stages. Each design stage was developed to help the dog learn how to walk faster, keep his balance, and become more comfortable with his new walking prosthetic. The wheel structure was built with a wider stance to act like a set of training wheels on a bicycle to help the dog avoid falling from side to side. A third front leg was added to solve the falling forward problem. This leg was designed to be on the same level to the ground as the side wheels so the dog could easily get his traction and not fall forward. Then, a second front leg was constructed a bit higher off the ground so the dog could learn to balance himself on the two main wheels.
Final Design:
Once the dog had mastered the balance of the training wheel design, we returned to the final (and also the original) wheel frame design. These wheels had a stance closer together.
Patent Pending for Dog Wheelchair Design
The whole class was passionate about making life better for disabled pets. Whatever has your pet down, whether they were born without legs, paralyzed, suffered a stroke, have serious back troubles (injury or disc disease), or even everyday issues like severe arthritis or hip dysplasia, there are ways to help. Your precious pet may have an excellent chance of overcoming their observed disability and be mobile again! Whether it be a disabled animal or human, some kind of assistance can be given to help them become more mobile. Dr. Bob and his students have a patent pending on this project to support a foundation for scholarships and create funding for the CADD program at Aiken County Career & Technology Center.
Credit: This story has been generously shared with us by Mr. Bob “Dr. Bob” Molkenthin, CADD Instructor at Aiken County Career & Technology Center.
Share this Post