
Unity 5 came out a few weeks ago. It boasts a lot of new features that will make it an even more powerful game engine. Now that Unity 5 is out, I decided it would be a good time to update my Unity Introductory Tutorial Series that I made about 3 years ago on Unity 3. Quite a lot has changed since Unity 3 and the content of my tutorials desperately needed to get with the times. So, as of last week, I finalized and uploaded the new series to our Youtube channel. The new series can be seen here.
It is split into five parts and by the end of it, you should know how to make a very primitive game that includes a first person mechanic, a shooting mechanic, terrain, skyboxes, sounds, collision, scripting, and more. A lot of the information is similar to the older version of Unity. However, I have a whole tutorial on one of Unity 5’s new features: the Audio Mixer. In this post, I am going to talk a bit about the audio mixer and some of the things you can do with it. Feel free to check out the rest of the tutorials if you are interested in learning the basics of Unity 3D.
Using Audio Mixer in Unity
The Audio Mixer in Unity allows you the ability to control the flow of audio sources within your game. An Audio Source in Unity is exactly what it sounds like; a source where audio assets play from. Audio Sources have a variety of settings that you can tweak to your liking. In Unity 5, there is a new setting attached to the Audio Source component called “Output”. The Output setting accepts an “AudioMixerGroup”. An Audio Mixer Group is basically an Audio Mixer for your project.

How Audio Mixer Works
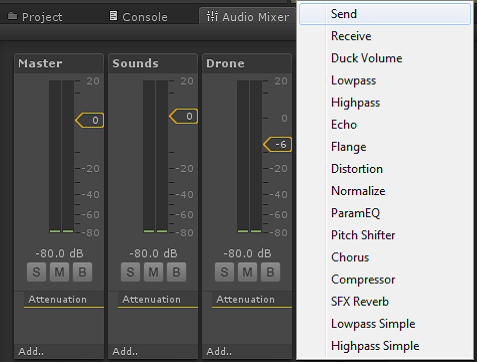
Audio Mixer Groups start off with only a Master channel, which controls all of the audio that is passed to the mixer. From the Master channel you are able to create children channels. You can assign audio sources to any channel you want. As you can see in the screenshot above, I have 4 different channels. Each one controls specific audio sources, but all of them feed into the Master Channel. So while I may individually control the volume of a specific sound effect, the Master Channel still controls the sound of all of these channels. Each child channel you make can have its own children as well. So you could create a “Sound FX” channel and create 2 children of “Sound FX” called “Fireball” and “Explosion”, for instance. The Fireball channel could control a specific Fireball Audio Source and the Explosion Channel could control an Explosion Audio Source. The Sound FX channel would control the levels and effects of both the Fireball and Explosion channels because they would both be children of Sound FX. And likewise, the Master channel would control the Sound FX channel because Sound FX is a child of the Master Channel. It might sound confusing when it’s written out like this, but it’s actually quite simple in practice.
Each channel in your Audio Mixer has effects that can be applied to them.
Effects are applied by clicking the “Add…” button at the bottom of a channel. You can choose the effect you want and you can then modify the effects by using the Inspector on the right side of the Editor. Once an effect is applied, it will show up in the list near the bottom of the channel, underneath where it says “Attenuation”. You can turn effects on and off by clicking the circle to the left of the effect’s name in the list.

Every channel also has three basic controls on them: Solo, Mute, and Bypass. When you choose to Solo a channel, the Mixer will 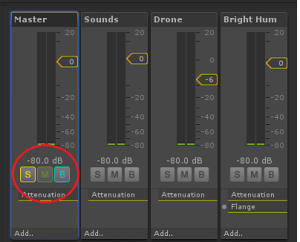
 only playback that specific channel in the mix. It will mute all the other channels. It’s important to note that you can solo multiple channels at once. This is helpful for when you have a lot of channels in a mixer and you want to hear just one or two channels at a time. Find the channel you want to hear, click the “S” icon and hear the results. The Mute option does exactly what it sounds like: it mutes the channel. You will want to keep in mind the parent-child hierarchy when muting or soloing channels. For instance, if I mute my Master channel, then I will not hear anything that the children channels are passing to the Master.
So even if my children channels may not be muted, I still won’t hear them because they pass to the Master. Lastly, the Bypass option bypasses effects that are attached to a channel. If you have a Flanger and a Compressor attached to a channel and you choose to Bypass that channel, then the Flanger and Compressor will no longer be applied. Unlike Solo and Mute, if you Bypass a parent channel, it does NOT bypass the effects of the children. So if you Bypass your Master channel, for instance, then the Flanger and Compressor that you had on your child channel will not be affected. You will still hear those effects being applied. You would have to bypass the child channel specifically to bypass those effects.
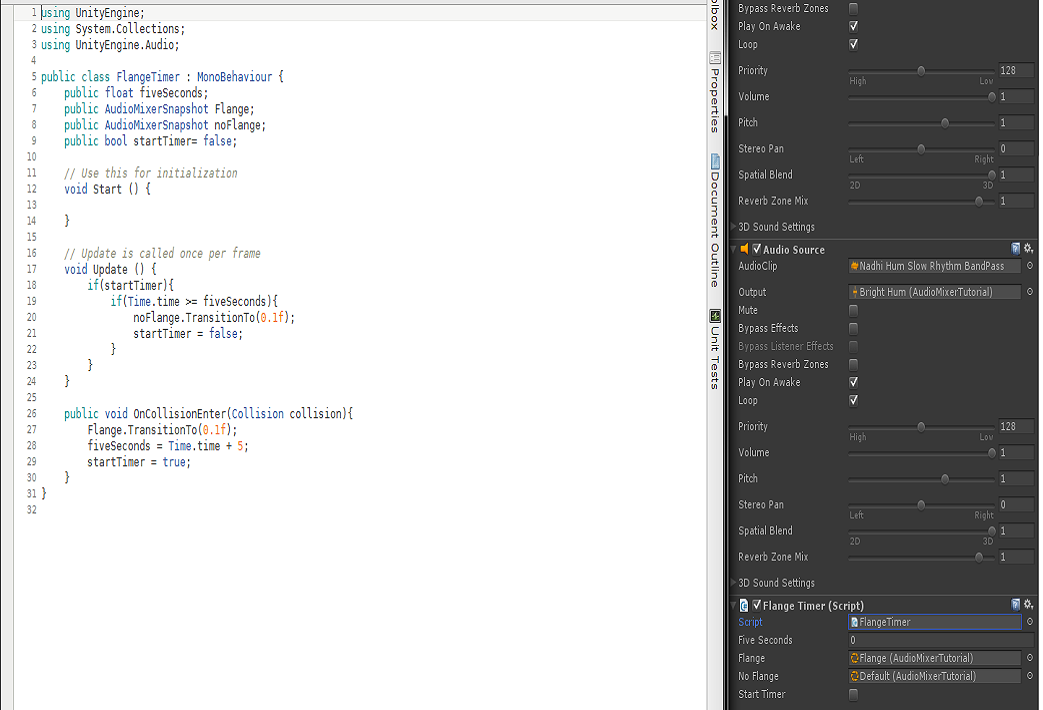
Audio Mixers have something called “Snapshots”. Snapshots are incredibly powerful in Unity. The idea behind a snapshot is to be able to save the current state of your channels and call on them via scripting. You can create multiple snapshots for your mixer. So, for instance, say you want to have custom settings for your sound and music on the Pause menu of your game compared to when your game is actively playing. You can create two snapshots: one for the Paused Game and one for the Active Game. The Active Game snapshot could have all of the channels at 0 DB with no effects applied to them. The Unity Audio Mixer Screenshot Paused Game snapshot could have the Sounds channel muted, the Music Channel lowered to -6 DB and a low pass filter applied to the Music Channel to cut off the high end of the music. Once you have the snapshots setup, you can create a script that utilizes the AudioMixerSnapshot type to transition from one snapshot to the other. In the following screenshot, you’ll see I have a script attached to a GameObject called “FlangeTimer”. It asks me for two Audio Mixer Snapshots. One called “Flange” and one called “NoFlange”. I have two snapshots setup in my project. One of them has no flanger attached to a sound effect, and the other one does. The script ensures that the default snapshot is the one without a flanger on it. However, whenever the object gets hit by something, it transitions to the flanger snapshot and plays the sound with the flanger effect on it for 5 seconds before returning to normal. My tutorial video elaborates more on how to do this.
In my opinion, snapshots are what make Audio Mixers incredibly powerful in Unity. It allows you to create really dynamic sound within your game without utilizing third party software or writing cumbersome code.
Audio Mixers also have Views that can be setup. Views are exactly what they sound like. They are preset views that represent your mixer. You can disable the visibility of a channel by using the “Groups” section at the bottom of the Audio Mixer. You’ll see your heirarchy of channels listed along with an eyeball icon to the left of their names. When you click the eyeball icon it toggles the view of that channel on or off. If you create multiple views using the “Views” section at the bottom right of the mixer, you can save customized views depending on your needs. Say you want a view that only shows you projectile sound effects, you could create a custom view called “Projectile SFX” and you can turn off the visibility of any channels unrelated to projectiles in your game. By choosing this view, you will have quick access to a cleaner, more streamlined workspace to work in. You can always choose to go back to your default view where all your channels are visible.
Lastly, it’s possible to create multiple Audio Mixers in a project. This is very useful if you have a decently large project with lots of audio assets. When you create a new Audio Mixer, you’re able to have a whole different set of channels, effects, snapshots, etc. One instance that I could see this being beneficial is to separate Sound FX and Music in a project. You could have one mixer that’s exclusive to sound FX Sources and one mixer that’s exclusive to music sources. This would allow you more control and a more streamlined workspace over your assets. It would be a lot easier to keep your audio flow more organized and less confusing by separating these assets into multiple mixers.
That wraps up this introductory overview of Audio Mixers for Unity 5. This post only touches the surface of what Audio Mixers are and how they can be used. If you want to really know how to implement them in a meaningful way, I highly recommend watching the tutorial. It explains how to do everything I talked about in this post. And don’t forget, if you’re a student or teacher or you represent an Academic Institution, check out our discounted Unity products.
Blogger: Mark Philipp, Application Engineer at Studica
Share this Post