I am working on a Unity Project in my free time. Recently, I wanted to have the ability to dynamically change the material properties of objects when the player looked at them. I did not want a static, unchanging material. I needed to be able to use C# scripts to make the material change features during gameplay. This is relatively easy to do. However, Unity’s API was not as simple for this task as I had hoped. So, in order to make life easier for you, this post explains how you can manipulate material properties using C# scripts in Unity. The goal is to end up with is a 3D cube that changes color over time.
How to Change Material Properties in Unity
This is a slightly advanced topic, so I am going to assume you have a working knowledge of Unity’s basics. So, first thing’s first, create an empty 3D project.
- Click Game Object → 3D Object → Cube
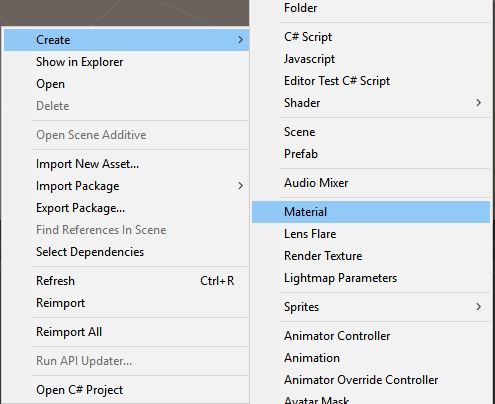
- Create a new material. Right-click on your asset viewer and choose Create → Name it whatever you want.
 3. Select the Cube in the hierarchy and replace the material with the new material.
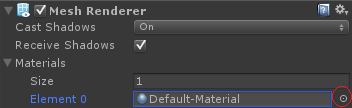


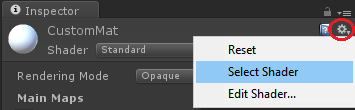
4. Go to the asset viewer and left click on your material that you created. Click the gear icon at the top-right of the inspector and choose “Select Shader”, as seen here:
 At this point, the inspector will show you all sorts of information about the shader that your material is using. The information we are most concerned with are the shader properties, seen here:
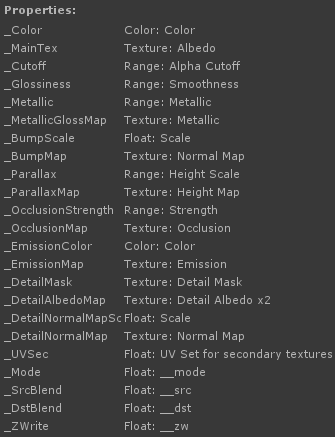
 Each of these properties can be called on via code by their property name. For example, “_Color” is a property name that we can call on to get the color property of the material. What we will do is call on the _Color property and use a coroutine to change the color over time. When you work on your own Unity project, you can always use the above methodology to find the shader properties of the shader your material is using. This is the easiest way to find out the name of the property that you want to modify via code.
Let’s Get Coding!
Click on the Cube in your hierarchy and click “Add Component”. Type “MatScript” in choose to create a new C# script. Open the script up in your IDE of choice and copy the below code into the script. I have done my best to use comments to explain what I’m doing in the script:
Use this Code:
 3. Select the Cube in the hierarchy and replace the material with the new material.

 At this point, the inspector will show you all sorts of information about the shader that your material is using. The information we are most concerned with are the shader properties, seen here:
 Each of these properties can be called on via code by their property name. For example, “_Color” is a property name that we can call on to get the color property of the material. What we will do is call on the _Color property and use a coroutine to change the color over time. When you work on your own Unity project, you can always use the above methodology to find the shader properties of the shader your material is using. This is the easiest way to find out the name of the property that you want to modify via code.
using UnityEngine;
using System.Collections;
public class MatScript : MonoBehaviour {
Color[] colors;
Renderer thisRend; //Renderer of our Cube
float transitionTime = 5f; // Amount of time it takes to fade between colors
void Start ()
{
thisRend = GetComponent<Renderer>(); // grab the renderer component on our cube
colors = new Color[6]; // We will randomize through this array
//initialize our array indexes with colors
colors[0] = Color.white;
colors[1] = Color.black;
colors[2] = Color.red;
colors[3] = Color.green;
colors[4] = Color.blue;
colors[5] = Color.magenta;
//start our coroutine when the game starts
StartCoroutine(ColorChange());
}
void Update ()
{
}
IEnumerator ColorChange()
{
//Infinite loop will ensure our coroutine runs all game
while(true)
{
Color newColor = colors[(Random.Range(0, 5))]; // Assign newColor to a random color from our array
float transitionRate = 0; //Create and set transitionRate to 0. This is necessary for our next while loop to function
/* 1 is the highest value that the Color.Lerp function uses for
* transitioning between two colors. This while loop will execute
* until transitionRate is incremented to 1 or higher
*/
while(transitionRate < 1)
{
//this next line is how we change our material color property. We Lerp between the current color and newColor
thisRend.material.SetColor("_Color", Color.Lerp(thisRend.material.color, newColor, Time.deltaTime * transitionRate));
transitionRate += Time.deltaTime / transitionTime; // Increment transitionRate over the length of transitionTime
yield return null; // wait for a frame then loop again
}
yield return null; // wait for a frame then loop again
}
}
}
What Does This Script Do in Unity?
The main thing to pay attention to is the material.SetColor() function. This function takes in a string value, which I specify as “_Color”. This is the name of the property that I found by looking at the shader in the step-by-step process I mentioned at the beginning of this post. By using the SetColor() function, I am able to dynamically modify the material’s properties, however I want.
Here’s a breakdown of what the script does.
- Create an array named “colors”.
- Generate a Renderer named thisRend.
- Make a float named transitionTime and assign it a value of 5. This float determines how long the color transition takes.
- Inside of Start, we assign thisRend to the Renderer component on our cube.
- Next, we initialize colors as an array with 6 indexes and then we initialize each index with a different color.
- Start the ColorChange() coroutine when the script starts up.
- Inside ColorChange(), there’s an infinite loop to ensure the coroutine runs indefinitely (this is generally bad practice, but for the sake of this post, I’m doing it anyway).
- Inside this infinite loop, I create a new Color named “newColor” and assign it a color based on a randomized index of our colors array.
- Next, we create a transitionRate float variable and assign it a value of 0.
- Now, we create a new while loop that runs while transitionRate is less than 1. The reason for this is because the Color.Lerp function interpolates based on a value of 0 to 1. Our transitionRate value will be incrementing until it reaches 1, at which point, the interpolation will be complete, and we can leave the loop.
- Inside of this loop, we set the color of the material to interpolate between its current color and newColor, which is a random color picked out of our array. We interpolate over the course of time as specified by transitionTime. If transitionTime is 2f, for instance, then it will take 2 seconds to transition our colors. You could make transitionTime a public variable or a serializable field if you wanted to modify it easily from the inspector.
- Lastly, we increment transitionRate by itself + Time.deltaTime / transitionTime. This ensures that transitionRate increments to a value of 1 over the course of transitionTime.
Conclusion
Obviously this is a very primitive example of how you can modify your materials. In the Unity projects I’ve worked on, I’ve found this methodology to be incredibly useful with more complex materials. For instance, I’ve used the Material.SetFloat() function to fade transparency of an outline material in and out consistently when the user is looking at a specific object. This makes an outline around an object appear to be flashing, which lets the user know what they are looking at and that they can select that object. Hopefully this post has given you a basic insight into how to modify your materials via scripts for Unity. With this knowledge, you can surely make your materials behave the way you want them to during runtime.
Academic Offerings from Unity
Significant academic discounts are available for the Unity 5 Pro Student and Teacher Suite. Learn more about this offer. Classroom packages for Secondary and Post-Secondary schools are also available. Visit Studica’s Unity Education store to learn more.
Blogger: Mark Philipp, Application Engineer at Studica
Share this Post