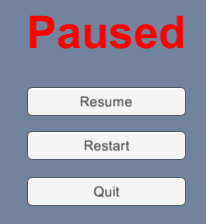
User interfaces (UI’s) are core features in just about every modern software application. Games are no exception to this rule. The vast majority of games utilizes some form of UI to display information such as health, skills, maps, ammo for a weapon, and more. Unity 3D offers a variety of UI elements that you can use in your game. In this post, I’ll provide instructions on how to create a simple Pause menu in Unity. The Pause Menu will display text that says “Paused” and it will have three buttons; Resume, Retry and Quit. It will also display the game time since the scene loaded. By the end of the instruction, you should have something that looks sort of like this:


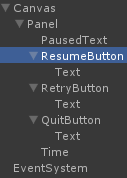
How to Create a Simple Pause Menu in Unity
To start off with, open up Unity and create an empty project. It doesn’t matter if it’s 2D or 3D. Once the project is created, save your current scene and call it whatever you want. I am calling my scene “Test”. Now, let’s make the UI.
- Right-click in the Hierarchy and choose UI –> Canvas
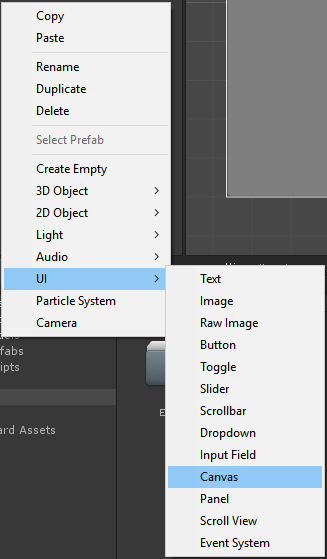

The Canvas is required for all UI Elements in Unity. The canvas is, essentially, what you place your UI elements on. Any UI Elements you create will have to be children of a canvas. When you create the Canvas, you’ll also notice an item called an “EventSystem” will be created in your hierarchy. This object is used for determining things such as mouse input, which is crucial for UI elements such as buttons.
Tips to setup your Canvas appropriately:
• Choose the Canvas in the Hierarchy
• In the Inspector, where it says “Render Mode”, choose “Screen Space – Camera”.
• Drag the main camera from the hierarchy and drop it on the “Render Camera” field of the Canvas in the Inspector.


The render modes for canvases are discussed in more detail here. For this tutorial, we will just use Screen Space – Camera to keep things simple. This will basically make sure our UI is always displaying within our camera’s view.
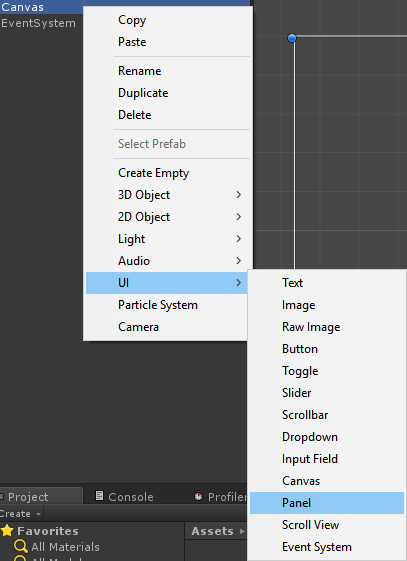
Now we will want to add a Panel to the canvas. A panel is basically a section that you can place UI Elements on. What I like about panels is that you can easily turn them on and off via scripts without having to affect the Canvas as a whole. This allows you to create a more dynamic UI based on the state of your game. For example, maybe you have a multiplayer game where your player can join a party of other players. When a player joins the party, you want a menu to show up on the UI that displays the names of the other members in the party as well as their HP. However, you still want all the normal UI elements (map, skills, HP, mana) to stay on your player’s screen. You can use a panel to put the player names and HP onto their own menu and you can toggle that menu on and off based on whether or not the player is in a party.
How to Create your Panel:
• Right-click on the canvas in the hierarchy and choose UI –> Panel

You’ll see your game scene become a semi-transparent white color. This is because Panels have an Image element attached to them. You can change this color and the transparency using the Color field on the Image component of the Panel in the Inspector. For this tutorial, I’m leaving it default.
Now, let’s add our Paused text. Right click on the Panel in your hierarchy and choose UI –> Text.
When the text first gets created, you’ll notice that you can move it around like you can any other game object in Unity. Generally, when dealing with UI elements, I prefer using the Rectangle Transform tool to move and resize elements:
![]()
![]()
Place your text wherever you want. I placed mine in the horizontal center of the panel and above the vertical center. You’ll notice when you use the rectangle transform that you can see the center-lines of both the x and y axis of the Panel’s Rectangle. This allows you to easily center UI elements within the panel if you prefer.
Instructions to Modify your Text:
- Left click the Text object you just created in the hierarchy.
- First of all, resize the object in your scene view so that it is of a decent size. We will be making our text larger so our text area needs to have room to display the text.
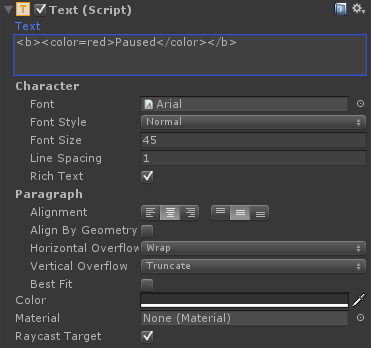
- In the inspector, locate the Text (Script) component and type <color=red>Paused
- Find the “Font Size” field on the Text (Script) component and left click on the “Font Size” text and drag your mouse around. You will see the value go up and down with your mouse movement. Find a size for the text that you like.
- Find the “Paragraph” section of the Text (Script) component and choose the Center setting under “Alignment”. Then, to the right of that setting, choose the center vertical alignment setting.

What mine looks like:


The first thing you’ll probably notice is the tags that we used in the text field. Unity can make use of Rich Text, which allows you to use markup tags to modify the way text looks. In this example, we are specifying that we want bold-faced, red font. You always have to close a tag in order for the modification to show up. You can read more about it here.
The Font Size field is simply adjusting the size of the font. If you are having trouble seeing your font in your game view, you might need to resize the Text UI rectangle in your scene view using the Rectangle Transform tool as described earlier. The rectangle needs to be large enough to fit the large font size.
The alignment settings are aligning the text in the center both horizontally (first setting listed) and vertically (second setting listed). You’ll notice that there is a color setting for the text. This can also be used to change text color. However, there will often be times where you may have UI elements that are dynamic depending on what’s happening in your game. Sometimes you may want a single Text element to display multiple things depending on the state of your game. In this situation, I find it easier to change the color using a tag than to try to dynamically change the color component via a script. I mostly wanted to use the tag to demonstrate Rich Text functionality for this tutorial.
How to Create your Buttons:
The next thing we will do is create three buttons. Buttons have built in functionality that will allow you to call on something within your game when they are pressed. For example, we will be making a Quit button that, when pressed, will send a call to a script to run a function that will quit the game.
- Right-click on the Panel object in your hierarchy
- Choose UI –> Button
- Repeat this process two more times (or copy and paste the button you just made)
- Once all three buttons are created, move each one below the previous one so that it looks something like this:

- To change the text of each button, expand each button in the hierarchy and you’ll notice that each one has a “Text” object as a child.

- Left click on the text object and change the text by using the text field. Change each button’s text so they read “Resume”, “Restart”, and “Quit” as seen in the screenshot posted earlier.

Before we get around to making these buttons work, let’s add one last element to our menu.
• Right-click the “Panel” object in your hierarchy
• Choose UI –> Text
• Left-click on the new Text object you just made and change its text so it says “Time Since Startup: ”
• Resize the font size of the text so it looks good to you. You may have to resize the text element’s rectangle in order for it to fit properly.
• Center align the vertical and horizontal alignment of the text.
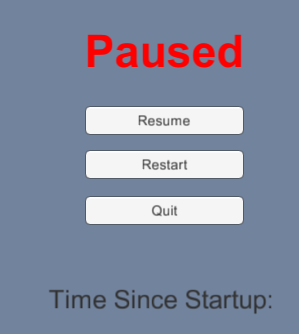
Your game view should now look something like this:

Now we are at the point where we want to create some functionality for our UI. The first thing we want to do is allow the player to press the Escape key to Pause the game and subsequently open this menu.
- Create an empty game object in your scene and call it _GM
- Select _GM from the hierarchy and choose “Add Component” in the inspector.
- Scroll down and choose “New Script”. Name the script “Manager” and make sure it’s a C# script.
- Open the script.
Copy and paste the following code into your script:
using UnityEngine;
using System.Collections;
using UnityEngine.UI; //Need this for calling UI scripts
public class Manager : MonoBehaviour {
[SerializeField]
Transform UIPanel; //Will assign our panel to this variable so we can enable/disable it
[SerializeField]
Text timeText; //Will assign our Time Text to this variable so we can modify the text it displays.
bool isPaused; //Used to determine paused state
void Start ()
{
UIPanel.gameObject.SetActive(false); //make sure our pause menu is disabled when scene starts
isPaused = false; //make sure isPaused is always false when our scene opens
}
void Update ()
{
timeText.text = "Time Since Startup: " + Time.timeSinceLevelLoad; //Tells us the time since the scene loaded
//If player presses escape and game is not paused. Pause game. If game is paused and player presses escape, unpause.
if(Input.GetKeyDown(KeyCode.Escape) && !isPaused)
Pause();
else if(Input.GetKeyDown(KeyCode.Escape) && isPaused)
UnPause();
}
public void Pause()
{
isPaused = true;
UIPanel.gameObject.SetActive(true); //turn on the pause menu
Time.timeScale = 0f; //pause the game
}
public void UnPause()
{
isPaused = false;
UIPanel.gameObject.SetActive(false); //turn off pause menu
Time.timeScale = 1f; //resume game
}
public void QuitGame()
{
Application.Quit();
}
public void Restart()
{
Application.LoadLevel(0);
}
}
Save your script and go back into the Unity Editor.
- Left click on the _GM object in your hierarchy.
- Drag and drop the Panel and Time Text objects into the appropriate fields on the Manager script in the Inspector

If you were to play your game at this point and press the Escape key, your Panel should show up with your UI elements on it. You should also see your Time text displaying the time since the scene loaded.
However, you’ll notice that none of the buttons do anything. We’re going to fix that.
- Select your Resume button in your hierarchy
- Under the Button (Script) component in the inspector, you’ll notice an “On Click()” section. This is where we add functionality for the button.
- Click the “+” icon at the bottom right of this menu. You’ll notice a field come up in this list.
- Drag and drop the _GM object into the Game Object field in the OnClick() section of the component.
- Click on the dropdown that says “No Function” and choose Manager UnPause()
What we just did is assigned the button some functionality. Now, when we click on the button, the UnPause() function from the Manager script that’s attached to the _GM Game Object will run. In order for you to call on a function through a UI Button, that function has to be declared public. That is why I made all of those functions in the Manager script public.
Now, if you run your game, press escape to bring up the pause menu and then click the “Resume” button. The pause menu should go away and the game will resume. This tells us that the button functionality is working.
So, let’s get the rest working:
- Select the Retry button in your hierarchy and find the OnClick() list.
- Click the “+” icon to add a new item to the list.
- Drag the _GM object into the Game Object field.
- Click the dropdown that says “No Function”
- Choose Manager > Restart()
- Lastly, click on the Quit Button in the hierarchy and find the OnClick() list in the inspector
- Click the “+” icon
- Drag the _GM object into the Game Object field
- Click the dropdown that says “No Function”
- Choose Manager > QuitGame()
One last thing before we’re finished. In order for the Restart function to work, we need to add our scene to the scene index list.
- File > Build Settings… > click the “Add Open Scenes” button.
This assigns the current scene to the scene index list. Since it’s the only one in the list, it’s assigned to index 0, which is what our Restart() function is calling on with Application.LoadLevel(0).
Now, if you play your game and press escape, you should be able to use all of the buttons. The restart button should reload the scene. You can verify this by looking at the time since startup on the pause menu. It should reset every time the scene is loaded. The Quit button will not be noticeable unless you build the program and run it. The Unity Editor cannot quit out of the application so the Application.Quit() function doesn’t do much while you’re in the editor. However, if you go to File > Build & Run and choose the settings you want, the project should run in a separate window. Then you’ll be able to click Quit and actually close out of the program.
That concludes this tutorial. Hopefully you better understand how to create UI’s in Unity. There are lots of other, more intricate UI elements that I did not discuss. I encourage you to experiment with them and see all the cool things you can do. Be sure to find Studica on Facebook, Twitter, LinkedIn, and YouTube. Thanks!
Blogger: Mark Philipp, Application Engineer at Studica
Share this Post