Lumion is a powerful rendering program for Architectural Visualization. We have written several articles about Lumion here on our blog. This article is going to detail what I think is the best workflow of bringing your Revit model into Lumion. As with any program, there are many ways you can accomplish something. However, I had to recently do a demonstration of Lumion 4.0 and I was running into some oddities when I tried exporting my Revit model as an FBX and bringing it into Lumion.
Tricks for Importing Revit items into Lumion
The materials of your Revit model don’t seem to transfer over seamlessly into Lumion if you do a normal FBX export. I am not sure why this is, but I think it has to do with the Autodesk Material libraries and their compatibility with other software. This is a known issue with software such as Unity 3D. For whatever reason, Autodesk’s material libraries contain some information that other software has difficulty interpreting. So, one possibility is to bring your exported FBX file into 3DS Max and make sure all the material assignments are proper. But the best workflow that I found was to use Lumion’s “Revit to Lumion Bridge” plugin.
This plugin becomes a tool within your Revit program. When you use it, you are able to export whatever 3D View you want as a Collada file, which can be imported into Lumion. The best part about this is that it keeps your materials intact, which saves you the headache of assigning all the materials in 3DS Max or redoing everything in Lumion once it’s been imported.
Instructions for Lumion Bridge and Revit
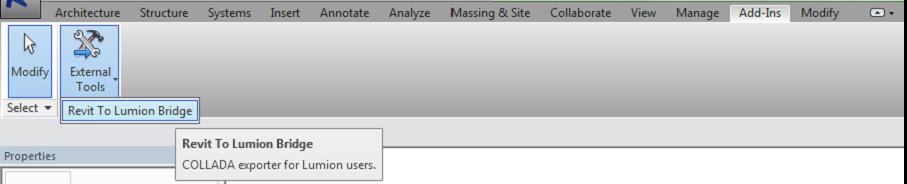
First of all, you need to download the plugin here. Once the executable is downloaded, run it and proceed through the installer. Once you have the plugin installed, open up your Revit software and open up a 3D View of a model that you want to bring into Lumion. Once your 3D view is opened, click on the “Add-ins” tab on the ribbon. Click the “External Tools” drop-down and you should see “Revit to Lumion Bridge” listed. Click on this item.
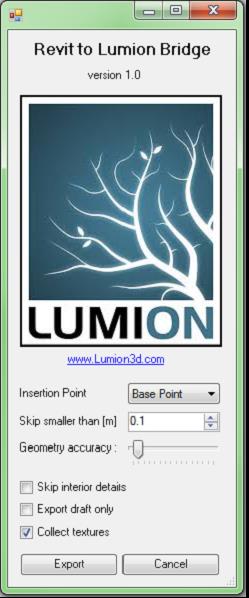 The Revit to Lumion Bridge exporter window will pop up. Here, there are a handful of options. Just for clarification, the “Geometry Accuracy” slider is associated with the graphical detail of your model. Sliding this all the way to the right should result in a finer detailed model, but a larger file size. Once you have all the options you want selected, click on “Export”. A window will pop up, asking you where to save the file. Choose the location you prefer and save the file. The export time Depends on the settings you’ve chosen and the hardware of your computer. Typically, it won’t take too long unless you have an enormous model.
Once you have the file exported to the location you want, open up Lumion. Create a new scene in Lumion from the opening menu. Once the scene is loaded, click on the “Import” block on the left side of the screen and choose “Add a New Model”.
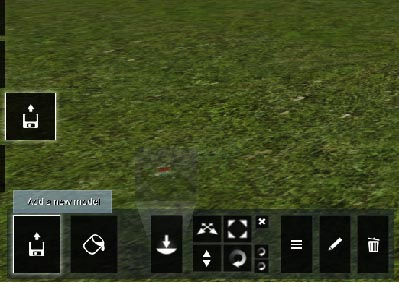
Browse to wherever you saved your exported file and double-click on it. A Window will pop up, asking you to name the model and whether or not you want to import animations. Choose the options you want and then click the Check Mark icon at the bottom right of this window.

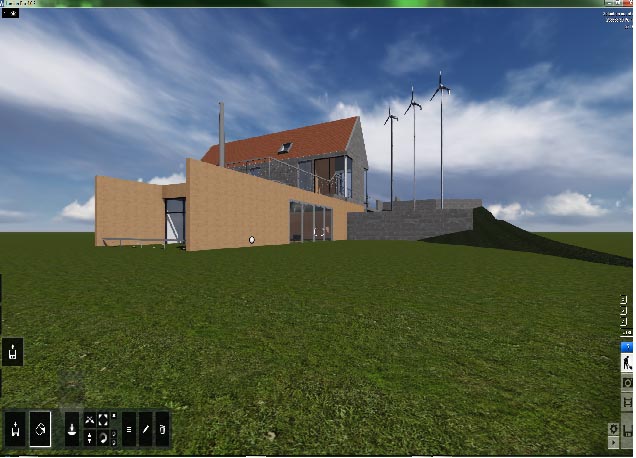
Once you’ve done that, you will then be able to place your model in your scene by moving your mouse around. Once you’ve settled on a spot, left click and the model will be placed. Now that the model is in the scene, you can utilize all of Lumion’s features to bring your model to life.
Share this Post