One of the most common mechanics that you’ll find in almost any video game is the ability to shoot something. Bullets, fireballs, arrows, etc. As a game designer, you can have your character shoot whatever your heart desires. Of course, implementing a shooting mechanism is not quite as simple as running a function called ShootBullets(). In this post, I am going to outline how you create a projectile and shoot that projectile outwards from a character using the Unity Game Engine.
Before I jump into it, I want to post a link to my tutorial video that covers this topic in detail. If I fail to cover something in this post that you are curious about, then check out that video. It may cover the topic you seek. Also, these instructions assume that you have an entry level understanding of the Unity game engine. You should know what transforms and rigidbodies are at the very least.
Preparing to Create Projectile in Unity
First of all, we need to think about the logic of shooting a projectile in 3D space. We have to have a character that our player controls. This character needs to have a spawnpoint attached to it as a child. Making the spawnpoint a child of the main character ensures that the spawnpoint moves position according to the movements of the parent character. Lastly, we need a script that dictates what our projectile is, and how we instantiate it and move it within our scene. That’s the basic overview of what all we will need to make this mechanic work.
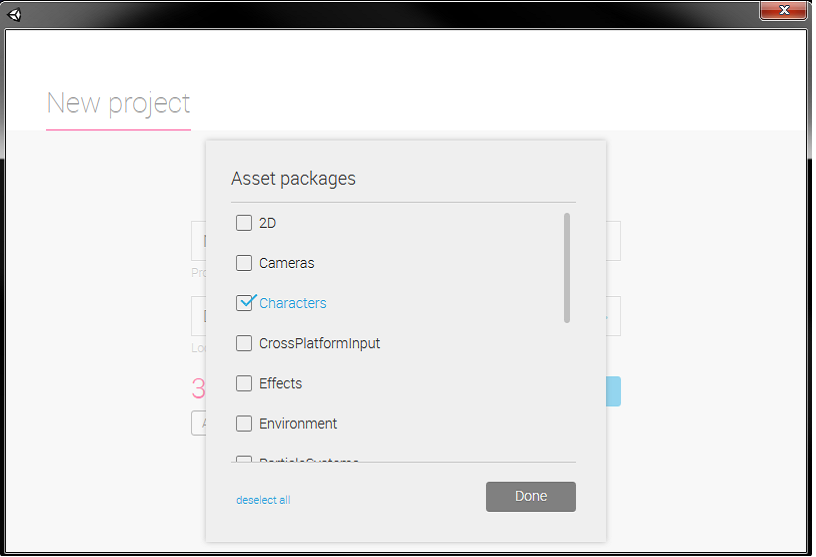
The first thing you need to have is a character. For this example, we will use an FPS Character. When you create your Unity project, be sure to import the Standard Assets Character package into your project, as seen in this screenshot.
Getting Started
Once your project is created, go to your asset browser and open up Standard Assets → Characters → First Person Character → Prefabs → Drag and Drop an FPS controller into your scene. You will also want to create an object that you can stand on. Go up to “Game Object” on the menu bar and choose “3D Object” → Choose Cube. Once the cube is in your scene, scale the X and Z axis out so that the cub resembles a plane that you can walk on. Place your FPS character over the cube. Now, when you play your game, you should be able to move using WASD. You can also jump using spacebar. If you have a Main Camera in your hierarchy, go ahead and delete it since the FPS Controller has a camera attached to it already.
Now that we have our character controller, we need to create a spawnpoint. Our spawnpoint is going to be an empty transform whose location will be used in our script to determine where our projectile spawns at. To create this, go to Game Object on the menu bar and choose “Create Empty”. This will create an empty transform. Remember, a transform is simply XYZ coordinates in our 3D space. This is perfectly fine for what we need the spawnpoint to do. Once you have the empty gameobject in your scene, I recommend renaming it to “Spawnpoint” for clarity. Next, you will want to move the spawnpoint into a position in front of your controller, as seen in the screenshot below. NOTE: My FPS Controller likely looks different than yours.
Once you’ve moved the spawnpoint into position, make it a child of the controller by dragging the Spawnpoint onto the FPS Controller using the Hierarchy. This should ensure that when the FPS Controller moves, the spawnpoint stays in its same position relative to the controller. This is important as the spawnpoint will consistently stay in front of wherever our character is facing.
At this point, we can create our script that will create and move the projectile. Choose your FPS Controller in your hierarchy. In the Inspector, click “Add Component”. Search for “Script” then choose “New Script”. Name the script Projectile and make it a C# script. I will also show the Javascript for those who need it. Once your script is added to your controller, open it in MonoDevelop.
Here’s the C#code You Need:
using UnityEngine;
using System.Collections;
public class Projectile : MonoBehaviour {
public Rigidbody projectile;
public Transform Spawnpoint;
// Use this for initialization
void Start () {
}
// Update is called once per frame
void Update () {
if(Input.GetButtonDown(“Fire1”)){
Rigidbody clone;
clone = (Rigidbody)Instantiate(projectile, Spawnpoint.position, projectile.rotation);
clone.velocity = Spawnpoint.TransformDirection (Vector3.forward*20);
}
}
}
Code for Javascript:
var projectile : Rigidbody;
var Spawnpoint : Transform;
function Update () {
if(Input.GetButtonDown(“Fire1”)){
var clone : Rigidbody;
clone = Instantiate(projectile, Spawnpoint.position, projectile.rotation);
clone.velocity = Spawnpoint.TransformDirection (Vector3.forward*20);
}
}
Breaking Down the Script:
Firstly, we are declaring a Rigidbody named projectile and a Transform named spawnpoint. As you can probably guess, these will be used to represent the Rigidbody we want to use for our projectile and the XYZ location we want to use as our spawnpoint. The reason we declare them outside of our functions is so that we can customize them within the Unity editor by dragging and dropping the game objects directly onto the script.
Next, let’s look at the Update() function. Update() is called every frame in Unity. So while your game is running, whatever is in the Update() block is executed every frame. The first thing we are doing is creating an IF statement to determine whether or not the user is pressing a fire button. “Fire1” is defined in Unity under the Input settings, which can be modified by going to the “Edit” menu bar → Project Settings → Input. The Input setting is how Unity knows which keys are associated with “Fire1”. In this case, “Fire1” will work for our Left Mouse Button. Once the IF statement determines if the user is pressing the fire key, we start to execute the bulk of our code.
Establish a Rigidbody
The first thing we do is establish a new Rigidbody named “clone”. We then assign clone to an instantiate function. If you want to know what variables the instantiate function takes, refer to the API Documentation. In the method of instantiate we are using is public static Object Instantiate(Object original, Vector3 position, Quaternion rotation). Our Object is projectile since that is the Rigidbody object that we want to spawn. Our Vector3 position is Spawnpoint.position. Spawnpoint.position returns the Vector3 value of our Spawnpoint transform. This ensures that our projectile is spawning at the Spawnpoint position. Lastly, we specify the rotation that we want to use for the projectile. We call projectile.rotation to specify that we want to use the rotation of the projectile rigidbody.
The instantiate method now will create an instance of our projectile rigidbody at the spawnpoint’s location with the projectile rigidbody’s rotation. While this is all great, if you tried to play your game and press your left mouse button, you would see that the object gets created and just falls to the ground. This is because we have nothing to tell the object what to do once it’s instantiated. The next line in our code defines that behavior. clone.velocity will either get or set the velocity of our rigidbody. In our code, we are setting it to the Spawnpoint object’s forward vector multiplied by 20. Multiplying by 20 simply makes the object move forward at a quicker pace. If you changed it to 100, for instance, the object would move much quicker.
Finishing Up
Once you have the script written out, save the file in monodevelop and go back to the Unity Editor. Left click on your FPS Controller in your hierarchy. Look at your Projectile script in the inspector. You will notice a section for Spawnpoint and projectile. Spawnpoint takes a transform and projectile takes a rigidbody. Drag and drop your Spawnpoint from your hierarchy onto the Spawnpoint box of the projectil script. This assigns Spawnpoint to the spawnpoint transform in your game. Our script will then use the spawnpoint game object as our Spawnpoint Transform in our script. Next, you need to drag and drop a rigidbody that will be used as your projectile onto the projectile box of the script. You can create a projectile really quick by going to Game Object on menu bar → 3D Object → Sphere → Add a Rigidbody component to the object using the inspector. Now drag and drop the sphere into your Asset browser to save it as a prefab. Drag and drop the prefab onto the projectile box in the Projectile script. This assigns our projectile Rigidbody to the projectile object you just made. Our script will now instantiate this object into the scene whenever the left click button is pressed.
Now if you play your game, you should be able to left click and shoot a projectile. And that’s all it takes! If you want to learn more about entry-level Unity concepts, check out my Unity Tutorial Series on Youtube. Thanks!
Blogger: Mark Philipp, Application Engineer at Studica
Share this Post