PTC Creo is an industry-standard 3D Design software. It is used for a wide number of applications across many different industries. I’ve recently been learning my way around the product and thought I would share the workflow for exporting an STL file from PTC Creo Parametric.
First off, an STL file is known as a stereolithography file. The file extension is .STL. This format has become the go-to file format for 3D Printable files. Just about every 3D Printer on the market has the ability to print STL files. The DaVinci AIO , Makerbot Replicator , and the Cube X , are just a few of the 3D Printers that can print STL files. Considering the wide adoption of STL as the common 3D Printing format, it’s important to know how to actually create an STL file in the software that you are using.
Exporting an STL file in PTC Creo Instructions
IN SEVEN EASY STEPS:
⇒ ONE: First of all, you have to open up PTC Creo Parametric. It’s important to note that Creo Direct, Creo Simulate, and Creo Layout do not offer the STL export option. You have to use PTC Parametric.
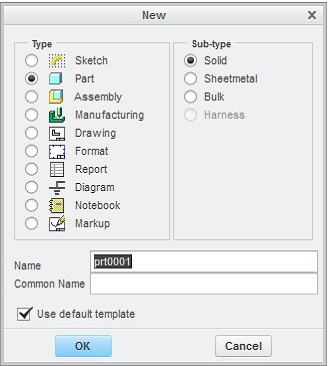
⇒ TWO: Once you’re inside Creo Parametric, you need to click “New” on the ribbon at the top-left of the program. This will open up a New File window. Go ahead and choose to make a new Part. Name it what you want and click “OK”.
⇒ THREE: Now we need to sketch something out and create a solid out of the sketch. Click the “Sketch” item on the Ribbon. You will need to choose a plane to sketch on. Hover over any of the planes that are already in the workspace and left click on it. You will see the name of the plane fill in the information boxes on the Sketch context window near the right side of your screen. Once you’ve confirmed all the information is correct, click “Sketch”.
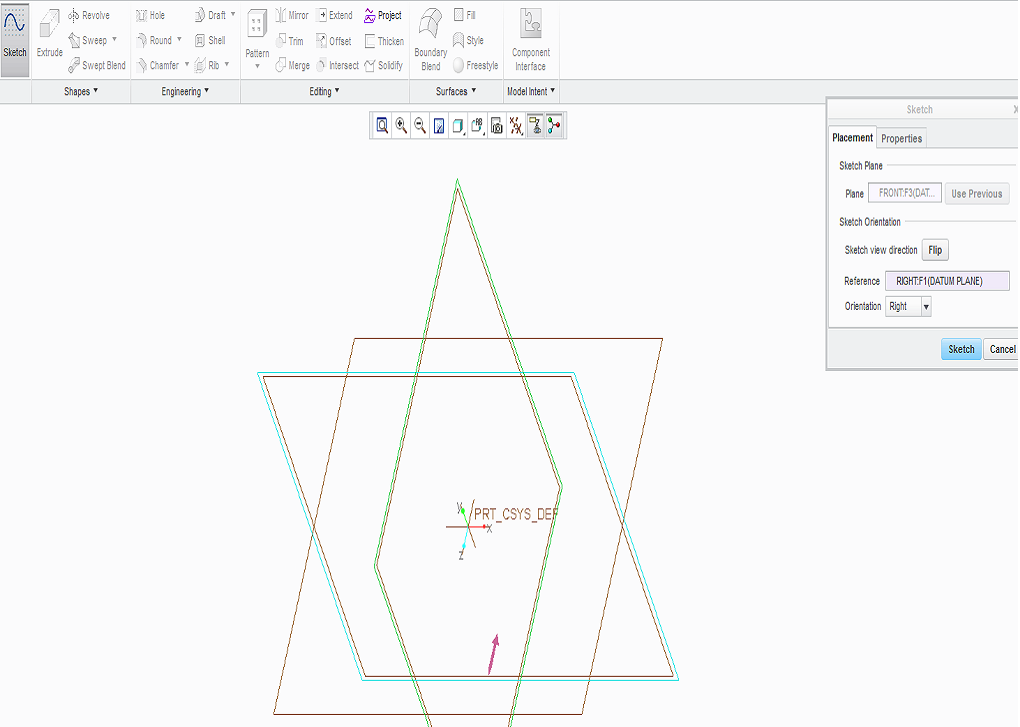
⇒ FOUR: Once you’re in the Sketching mode, you need to make some kind of basic sketch. For this article, I’m just going to make a basic rectangle. Click on the Rectangle Tool under the Sketching Panel of the ribbon. Left click inside of the sketch plane and move your mouse to the area that you want to make the rectangle end at. Left click again to create the rectangle. Once you’ve made the sketch you want, click the “OK” button near the right side of the ribbon. It has a Green Check Mark as the icon.
⇒ FIVE: Now that we have the rectangle sketched, we need to extrude it to make it solid. Choose the Extrude option from the ribbon. If you rotate your view around in the workspace, you should now see a solid rectangle. We want to make sure that the sketch has extruded as a solid. Look at the very left side of the ribbon and you’ll see a couple of options for extrusion. Make sure the left-most item is selected. It’s called “Extrude as Solid. This ensures that we can export our file as an STL file.

⇒ SIX: Once you’ve confirmed that everything looks good, click the Green Check Mark on the ribbon. This will complete the extrusion.
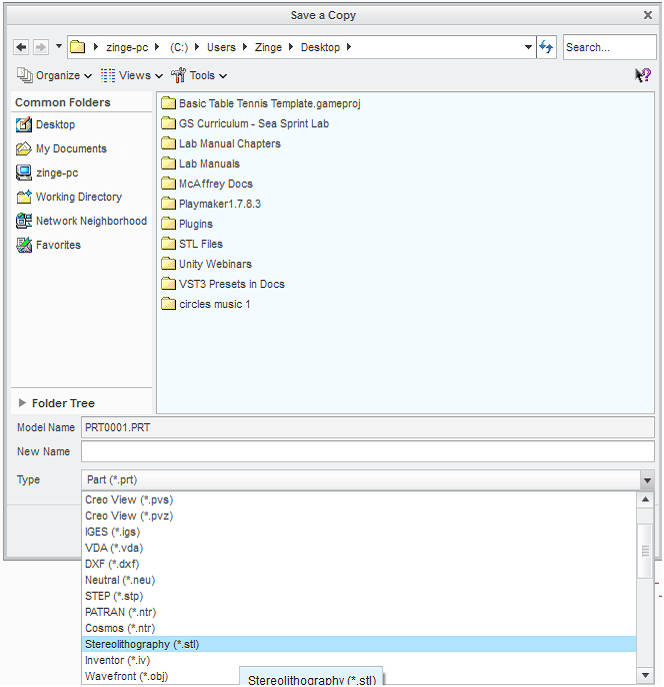
⇒ SEVEN: At this point, you have a model that can be saved as an STL file. Go to File → Save As → Choose “Stereolithography (STL)” from the “Type” drop down on the save menu. At this point, name the file whatever you want and save it wherever you want and click “OK”. Now you have an STL file of your model that you can print out.
In conclusion, this is a very basic look at exporting STL files. It’s important to consider the best practices for creating an STL file when you’re working on your model. Creo Parametric is a very powerful tool so I do hope that you dive into the software and start making some incredible models. Feel free to leave a comment or share this piece with friends, colleagues, etc. If you have any questions, you can reach us at www.studica.com.
Blogger: Mark Philipp, Application Engineer at Studica
Share this Post