Unity 3D offers an enormous API that provides ways to manipulate the vast majority of objects in your game. However, there are some features that are not as robust as you might hope. Take, for example, the ParticleSystem class. Let’s say, you have a particle system. You want to modify the radius of the particle system’s shape using a script. After a quick look at Unity’s documentation for the ParticleSystem class, you would assume that you could use ParticleSystem.shape.radius to modify the radius of the particle system. However, a problem arises when we try to do this. Unity throws us an error and tells us that ParticleSystem.shape.radius is read-only. This means it cannot be modified via code (at least, to my knowledge). What do we do now? Here is the solution I came up with.
How to Use Scripts to Modify Particles in Unity
Here are the the steps I took to resolve this issue. Let’s get started with serialized objects.
Use Serialized Objects
Honestly, I don’t have a good way to describe the SerializedObject class.The best way I can summarize it, is that it allows you access to modules of components that normally you can’t access or modify. So, we can use this class to get access to our particle system’s shape module and make changes to it. Let’s take a look at how to do this. I’m going to assume you already have a Unity project created that includes some kind of particle system that you want to manipulate. In my example, I am using a Cone-Shaped Particle System.
- Select your ParticleSystem and add a new C# Script to it named ParticleScript.
- Copy this code into your script (I’ve commented as much as I can to explain what’s going on):
Here is the Code:
using UnityEngine;
using System.Collections;
using UnityEditor; // Need this to access SerializedObject
public class ParticleScript : MonoBehaviour {
SerializedObject thisParticle; // This will be our modifiable particle system
bool isChanging; // Used as a flag for a coroutine
//Set these values in the inspector. Will modify angle and radius of Particle System
public float MAX_ANGLE, MIN_ANGLE, MAX_RADIUS, MIN_RADIUS, transitionSpeed;
void Start ()
{
/* Initialize and Assign thisParticle as a SerializedObject that takes properties
* from the ParticleSystem attached to this game object. */
thisParticle = new SerializedObject (GetComponent<ParticleSystem>());
thisParticle.FindProperty("ShapeModule.radius").floatValue = MAX_RADIUS;
thisParticle.FindProperty("ShapeModule.angle").floatValue = MAX_ANGLE;
thisParticle.ApplyModifiedProperties(); // This basically updates the particles with any changes that have been made
isChanging = false;
}
void Update ()
{
if(Input.GetKeyDown(KeyCode.R) && !isChanging)
StartCoroutine(ChangeRadius());
else if(Input.GetKeyDown(KeyCode.A) && !isChanging)
StartCoroutine(ChangeAngle());
}
IEnumerator ChangeRadius()
{
isChanging = true; // set true so user can't spam the coroutine
//This code will make the radius smaller if the radius is at its maximum already
if(thisParticle.FindProperty("ShapeModule.radius").floatValue >= MAX_RADIUS)
{
while(thisParticle.FindProperty("ShapeModule.radius").floatValue > MIN_RADIUS)
{
//grab the radius value and subtract it
thisParticle.FindProperty("ShapeModule.radius").floatValue -= Time.deltaTime * transitionSpeed;
thisParticle.ApplyModifiedProperties(); // This is used to apply the new radius value
yield return null;
}
}
//This code will make radius larger if radius is already at its minimum
else if(thisParticle.FindProperty("ShapeModule.radius").floatValue <= MIN_RADIUS)
{
while(thisParticle.FindProperty("ShapeModule.radius").floatValue < MAX_RADIUS)
{
//grab the radius variable and increase it
thisParticle.FindProperty("ShapeModule.radius").floatValue += Time.deltaTime * transitionSpeed;
thisParticle.ApplyModifiedProperties(); // Apply new radius value
yield return null;
}
}
isChanging = false; // set to false so user can input again.
yield return null;
}
IEnumerator ChangeAngle()
{
isChanging = true;
//This code will make the angle smaller if the angle is at its maximum already
if(thisParticle.FindProperty("ShapeModule.angle").floatValue >= MAX_ANGLE)
{
while(thisParticle.FindProperty("ShapeModule.angle").floatValue > MIN_ANGLE)
{
//grab angle value and subtract it
thisParticle.FindProperty("ShapeModule.angle").floatValue -= Time.deltaTime * (transitionSpeed * 2);
thisParticle.ApplyModifiedProperties(); // apply new value to angle
yield return null;
}
}
//This code will make angle larger if angle is already at its minimum
else if(thisParticle.FindProperty("ShapeModule.angle").floatValue <= MIN_ANGLE)
{
while(thisParticle.FindProperty("ShapeModule.angle").floatValue < MAX_ANGLE)
{
// grab angle value and increase it
thisParticle.FindProperty("ShapeModule.angle").floatValue += Time.deltaTime * (transitionSpeed * 2);
thisParticle.ApplyModifiedProperties(); // apply new value to angle
yield return null;
}
}
isChanging = false;
yield return null;
}
}
Next Steps for Using Serialized Objects:
Now that you have the code, here’s what to do next:
- Click on the Particle System in your hierarchy and find the ParticleScript object in the inspector. You’ll notice several public variables. For quick testing purposes, set your variables to look like mine:


- Now, if you run your game and press R or A, you should see the radius or the angle change, depending on which key you pressed. Note that you can only change one variable at a time due to the way I wrote the code. You could easily modify it so you could have the two coroutines run at the same time.

How do I Know the Name of the Module to Modify?
When I first messed with serialized objects, I had trouble understanding where “ShapeModule.radius” came from. The documentation included this string inside of the SerializedObject.FindProperty() function, but it didn’t explain where they got that string from. What I came to find out is that if you switch to Debug view in Unity, you will be able to see a list of the properties associated with a component. To open Debug view, click the triple-line icon at the top-right of the inspector and choose “Debug”:


You’ll then notice all the components broken down into more complex parts:
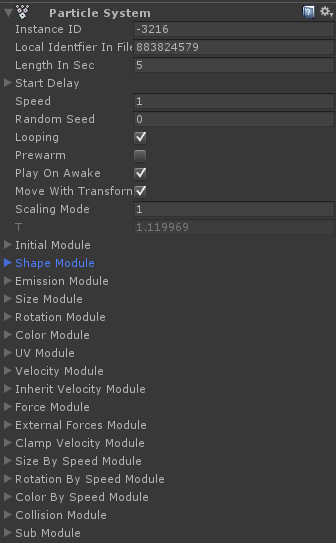

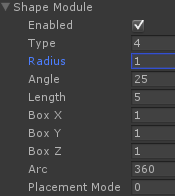
You’ll notice the “Shape Module” section. If you expand it out, you’ll see all the variables that make up the shape module, some of which don’t show up in the normal view at all. This is where you can find which variables you can manipulate.

Now, I can say thisParticle.FindProperty(“ShapeModule.radius”).floatValue = Time.deltaTime;
One weird bit of formatting is that in “ShapeModule.radius”, radius is not capitalized, even though it shows up capitalized in the Shape Module component in the inspector. I tried executing my code with a capitalized Radius, but it would not work. Considering this, I would assume the module name is capitalized where necessary, but members of that module are not.
Lastly, when you use floatValue, intValue, boolValue, etc. is dependent upon what type the variable was already. The easiest way to figure this out is to drag the value up and down in the inspector and see if it has decimal places or not. If it has decimals, you’ll want to use floatValue to modify the value. If it doesn’t, then you’d use intValue. Likewise, if a value shows true or false, then you’ll want to use boolValue. So, if I drag radius up and down in the inspector, it is quickly apparent that there are decimal places in this value. As such, I will want to use SerializedObject.FindProperty(“ShapeModule.radius”).floatValue to modify that value.
Conclusion
Hopefully, this post helps you understand alternative ways for you to take control over the objects in your game. If you ever find that Unity’s own libraries are not proving sufficient for what you want to do, you might want to try creating a Serialized Object to get access to the variables you need.
Academic Offerings from Unity
Significant academic discounts are available for the Unity 5 Pro Student and Teacher Suite. Learn more about this offer. Classroom packages for Secondary and Post-Secondary schools are also available. Visit Studica’s Unity Education store to learn more.
Blogger: Mark Philipp, Application Engineer at Studica
Share this Post