Unity 3D has some great tools for handling animations. In general, developers will utilize animation controllers (Unity calls them animator controllers) to handle which animations to play and when to play them. In this Unity tutorial blog, I’m going to provide step-by-step instructions to create a very simple animation controller. This controller will be able to play an animation when the user presses a button on their keyboard. Specifically, we will make an animation that will make a 3D cube red when the user presses spacebar. It will return to white when the user presses spacebar again.
What is an Animation Controller?

 If you’ve done any 3D modeling you’re likely familiar with 3D animation. Games heavily use 3D and 2D animations for models and sprites. The main difference between a video game and a 3D animated film, for instance, is that a video game must be adaptable to a wide variety of inputs and conditions. In a 3D animated film, the modeler animates every single frame of the film in a very specific way. In a game, this isn’t an option unless you’re rendering non-playable cut scenes. In a game, maybe you allow your user to move a character forward, backward, left, or right. Maybe the player can also run in any of these directions. Maybe the player can crouch and move in any of these directions at the same time. Each of these states requires a custom animation.
You need animations for the character in a crouching position, crouching and walking forward, sprinting and moving forwards, walking and moving left, and more. You can’t simply create a single animation that can somehow tell what your player is doing at any given time. This is where animation controllers come into play. An animation controller allows you to tell your object which animation to play based on conditions that you specify. If your character enters a running state, then you can tell the animation controller to play the animation for running forward, running backward, running right, or running left, depending on the input of the user. Now, let’s work through this Unity tutorial and learn how to make a simple animation controller.
How to Make an Animation Controller
I’m going to assume you know most of the basics of Unity, such as creating Game Objects and adding components to them.
- Create a new Scene
- Create a 3D Cube Game Object and position your camera to be looking at it
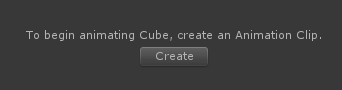
- Go to the Window menu and click on “Animation”. This will open the animation window
- In the animation window, click the “Create” button in the middle of the window.

- A window will come up asking you to specify a filename. Name it whatever you want. I named mine “RedAnim”.
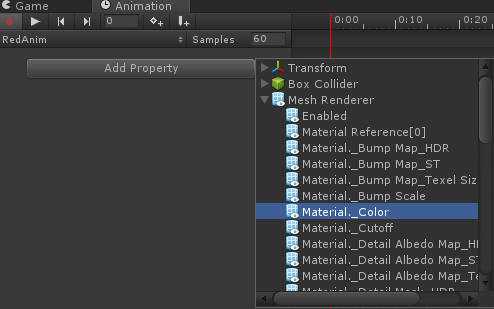
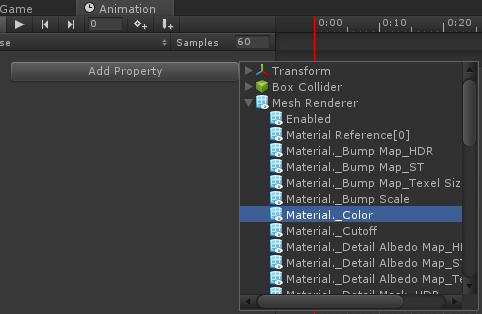
- In the animation window, click the “Add Property” button. Choose “Mesh Renderer”. Find “Material._Color” and scroll right in the window and choose the “+” icon to add it to the list of properties.

- This is all we need for the base animation. It will ensure that our cube is white.
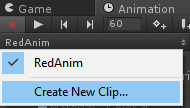
- Moving along in this Unity tutorial, we need to make another animation for our base color. Click the “RedAnim” header button and choose “Create New Clip…” as seen here:

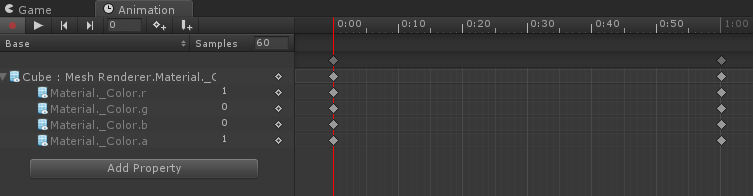
- Another dialogue box will come up asking you what to save the file as. Name it “Base”. We’re going to add the same color property again by clicking “Add Property” and choosing the Mesh Renderer → Material._Color option.

- Make sure your timeline is at 0:00 and change the g and b values to 0.

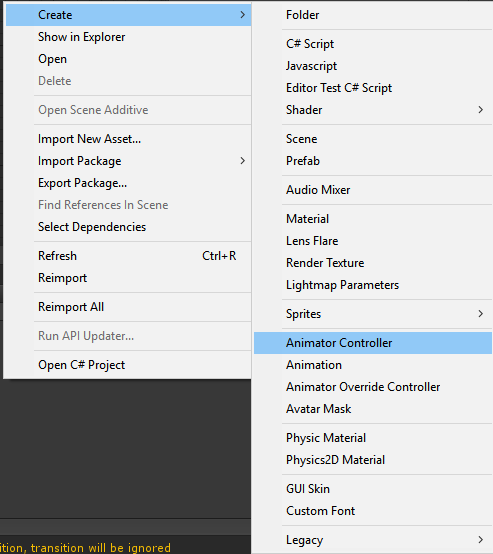
This will make the transition from red back to white look more natural. - Now, we need to create the animation controller. Right-click in the project window and click Create → Animator Controller. Name it whatever you want.

- Double click on the animator controller to open the animator controller editor. Once it’s open, drag and drop both of your animations into the animator controller window.
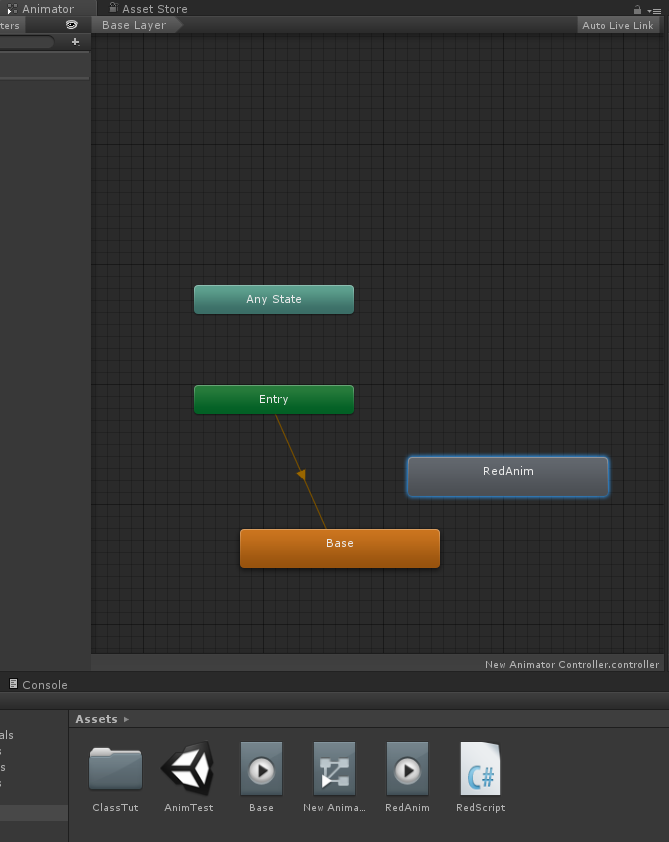

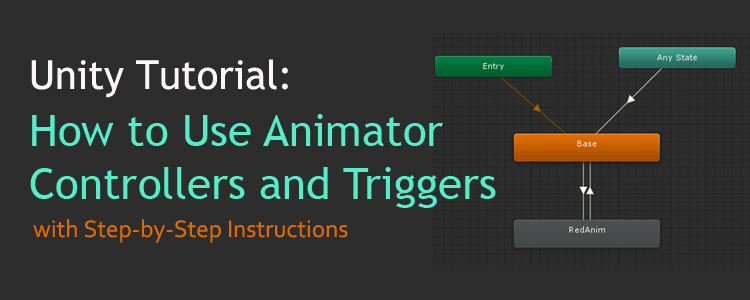
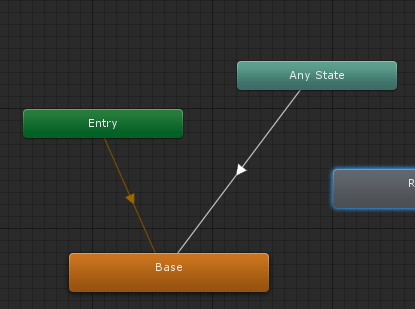
- The next part of this Unity tutorial is to create transition logic for our animations. Right-click on “Any State” and choose “Make Transition”, Move your mouse on top of the “Base” node and left click on it. This will connect an arrow from Any State onto the Base Animation, like such:

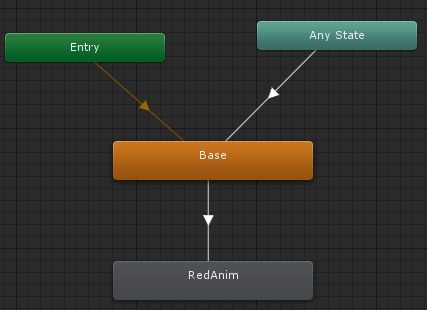
- Now, we want to be able to transition from our Base state to our RedAnim state. Right-click on “Base” and choose “Make Transition” and click on “RedAnim”.

- Now, we also want to be able to go back to our base state from RedAnim. So right-click on RedAnim and choose “Make Transition” and connect it to the “Base” node.
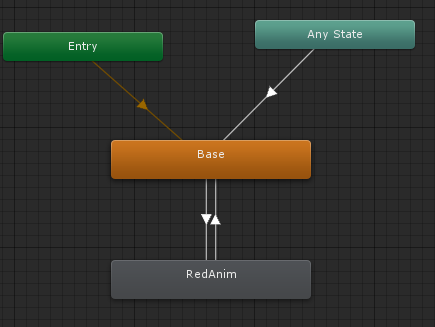

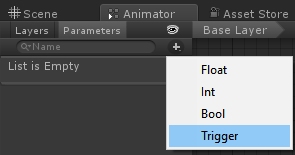
- This flowchart is basically what we’re looking for. However, we still need to create a variable that we can use in our code to be able to make the transition happen. To do this. Click the “+” icon near the top-left of the animator controller window and choose “Trigger” from the drop down:

- Name the trigger “MakeRed”. We’ll be able to call on this trigger via C#. However, we need to tell the transitions that we want to use this trigger to make a transition happen. Left click on the arrow going from base to RedAnim. You’ll notice the transition come up in the inspector on the right side of Unity. There is a section called “Conditions”. Click the “+” icon in this section and it will add the “MakeRed” trigger to the list of conditions.
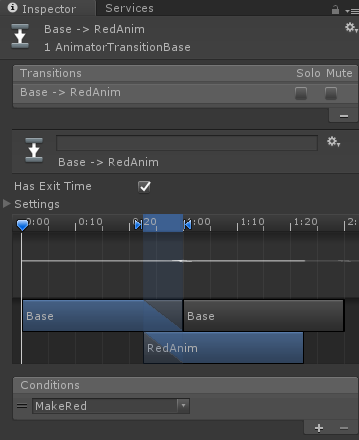

- We also need to do this on the transition from RedAnim to Base. Left-click on that arrow and do the same thing. Now Unity will know to only make these transitions happen if the MakeRed trigger is activated. Notice how we use a single trigger for both transitions. This works because each transition will only happen if we are already in that transition. So, if we are on the Base animation, then MakeRed can only cause the transition from Base to RedAnim to happen. The same is true for if we are on the RedAnim animation.
- At this point, we need to put the animator controller on our cube. Drag and drop the animator controller you created into the cube object in the inspector. The cube’s component list should look like this:
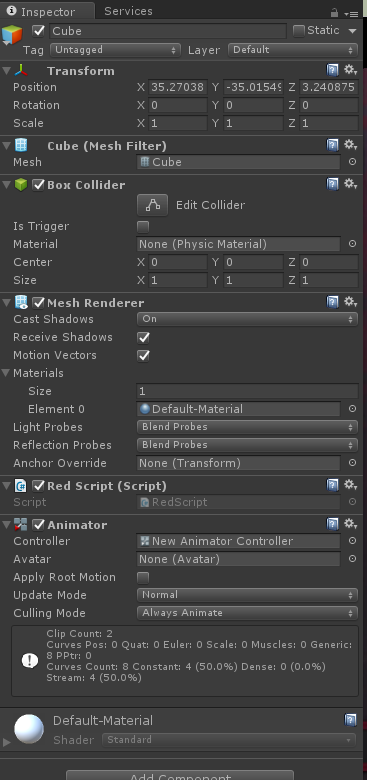

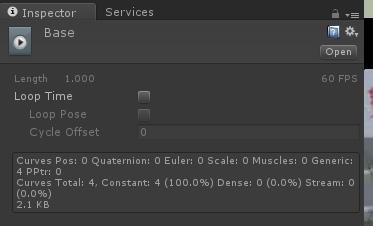
- We need to change one more thing on our animations before we create the script. Left click on the animation in your project window. In the inspector, uncheck the “Loop Time” box. This will ensure that looping is turned off on these animations. Do this for both animations.

Note that you may not always want to disable looping, depending on what you intend for your animation. - Now you need to create a new C# script named RedScript. This script is incredibly simple. It looks like this:
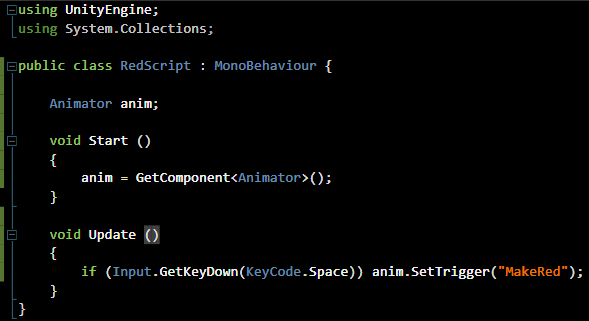

- All this script does is grab an Animator component on the object. It then listens for the user to press Spacebar. If spacebar is pressed, then we set the MakeRed trigger, which will then fire off our animation transitions.
- Save the script and attach it to the cube in your scene. Now, if you play the game and press spacebar. You should see the cube change to red. If you press spacebar again, it will change back to white. You can do this endlessly and it will keep making the same transitions occur. If you leave your animator controller node tree open while the game runs, you can see how your animations are behaving. This can be helpful for troubleshooting potential issues with your animation logic.


Summary
I hope you have enjoyed this Unity tutorial. Obviously, this is an incredibly simple animation controller but hopefully, it shed some light on how they work. To me, one of the most powerful features is the ability to call on Triggers or other animator controller variables via script. This allows you to have massive control over the flow of your animations depending on any number of factors in your game. Hopefully, you found this information helpful. Be sure to check out Studica.com for academic discounts on software, electronics, robotics and more. Check out more Unity tutorial postings on our blog. Good luck!
Blogger: Mark Philipp, Application Engineer at Studica
Share this Post